

Your scrubber is running. So why is the floor still wet?
You finish a pass, look back, and there it is: a wet stripe down the middle, little streaks where there shouldn’t be any, or water spilling off the ends of the squeegee every time you turn.
The vac motor sounds fine. No flashing trouble code. The recovery tank isn’t full.
Here’s the good news: most of the time, it’s not the motor. It’s air getting in somewhere it shouldn’t, or a squeegee blade that’s past its best edge. Both are cheap to fix, and most fixes take a few minutes with no tools at all.
In the video below, Josiah Robey of PowerKleen walks through exactly how he diagnoses weak pickup on a Tennant T7 and its twin, the Nobles SSR (Speed Scrub Rider). This post breaks it down step by step so you can follow along right at the machine.
The T7 and SSR use a simple system. Understand it once and every problem below makes sense.
The key idea: it’s a sealed loop. The motor can only lift water if the air path is tight from the squeegee all the way to the lid. A leak anywhere, even a small one, and suction drops everywhere. Think of it like sipping through a straw with a hole in it.
Before you touch anything, look at the pattern you’re leaving behind. It points straight at the cause.
| What you see on the floor | Most likely cause | Jump to |
|---|---|---|
| Water spilling off the ends, especially on turns | Weak suction — air leak or clog | Step 3 |
| One wet stripe right down the middle, sides dry | Squeegee tilted “toes down, butt up” | Step 4 |
| Small, random streaks in odd spots | Worn blade edge or trash caught under the rubber | Step 2 |
| Squeegee barely touching the floor or standing straight up | Squeegee height set wrong | Step 4 |
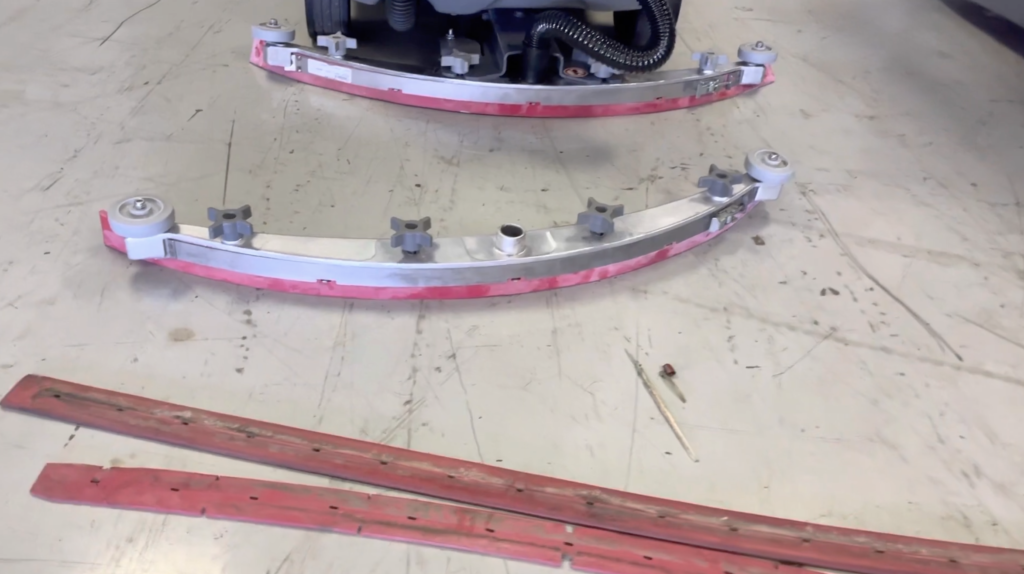
A rear blade does its job with two things: a square edge and a little bit of bend.
Get both right and the blade pulls water toward the hose, holds the seal, and keeps suction strong.
As a blade wears, its working edge rounds off or flattens. Look at the end of an old blade and it can look almost triangular.
The fix is free: every blade has four usable edges. Loosen the knobs, flip or rotate the rubber, and you have a fresh square edge. Flip it, flip it, flip it again — then replace it.
While you’re there, check the front blade for big tears. A large rip lets air in the same way a missing cap would, and suction drops.
Seeing thin streaks in random spots, even though pickup is otherwise good? Something is probably stuck under the rubber, letting a trickle of water slip past.
While you’re driving, tap the squeegee button off for half a second, then right back on. The squeegee lifts for an instant, the trash drops out, and it settles back down. The vacuum handles most debris, but larger or odd-shaped pieces can drag under the blade — this clears them without stopping.
Motor running, no error codes, but weak or no suction? Work down the loop in this order. Most machines give up the problem in the first three checks.
There’s a small filter and gasket at the vac motor inlet. Its job is to stop floating debris and early dust from reaching the motor’s lightweight impellers and bearings. Never run without it.
The filter is one of the cheapest parts on the machine. Replace it if it’s waterlogged (a saturated filter chokes airflow), badly clogged, or just old and funky-smelling.
This outer gasket matters far more than the filter. It’s where the top assembly seals against the recovery tank.
Make sure it’s in one piece, still glued down, and not torn. Occasionally the seal slips past the tank’s edge and sucks air.
The lift test: with the vacuum running, try lifting the lid. It should feel firmly sealed down. If it lifts easily, you’re leaking air there.
If the cap on the dirty water drain hose is loose or knocked off, air rushes in and the tank can’t build the vacuum it needs to lift water. Check it’s on tight.
If the filter, gasket, and cap are all good, compare suction at two points:
Suction at the squeegee end should feel about the same as at the tank. It doesn’t have to be overwhelming, but it shouldn’t drop off along the way.
Lower the squeegee, drive forward, and watch the rear blade. You want a small, even bend across the floor. If it’s standing straight up or not touching at all, you’re losing air pressure.
The squeegee mounting plate rides on two glide wheels. If they’re set too low, they hold the squeegee up off the floor.
If the outsides dry fine but a strip down the center stays wet, the squeegee is sitting “toes down, butt up.” There’s an adjustment bolt on the mounting plate that changes the squeegee’s angle. Turn it to lay the plate flatter until the blade contacts evenly across its whole arc.
This is normally set at the shop and left alone. But backing into a rack or taking a bump can knock the drag bar or bend the mounting tabs out of alignment. The adjustment bolt is the fastest way to dial it back in.
Print this and tape it near the charger.
None of these parts are expensive, and almost all of them swap out by hand or with a single tool. The real cost of weak pickup isn’t the part — it’s re-cleaning floors, wet slip hazards, and hours your crew doesn’t get back.
If you’ve worked through the list and your T7 or SSR still leaves water behind, PowerKleen can get you the right parts or put a tech on it.
Prefer to talk it through? Give us a call. We’re happy to help you figure out what’s going on.📞 Call Robey’s PowerKleen Direct: (859) 484-7337 (Monday–Thursday 7am–6pm)
Give us your name and number and our team will contact you as soon as possible.
Enter your email below to instantly unlock a $1,000 discount code toward your next equipment purchase.
🔒 We respect your privacy. No spam, ever.